Hello friends!
While working with Wooly Wire I wanted to make a quick tutorial on how to end the wire. Here are some photos showing the steps ;)
ENDING WOOLY WIRE TUTORIAL
Wonderful Wooly Wire!
SUPPLIES
Wooly Wire
Cutting Plyers
Round Nosed Plyers
Bent Chain Nosed Plyers
Fray Check
Here is the card that comes with your Wooly Wire. So this tutorial is my interpretation of how to end the Wooly Wire according to the last instructions.
A FEW TIPS ON WIRE-WRAPPING WITH WOOLY WIRE
Here are a few tips for making your wire-wraps with Wooly Wire.
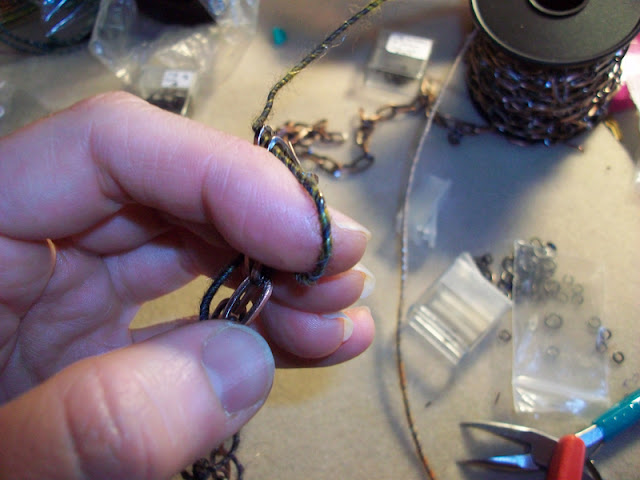
As you begin to wrap your Wooly Wire(WW for short) you can wire wrap it just like you would wire wrap any wire. The nice thing about ww is that unlike "naked" wire it won't get snagged and cause a kink in the wire. When you do your wire wraps for ww I have found that if you need to thread your wire through something like a link of chain you see here you want to thread it in a circular motion. This motion will help you easily maneuver your wire where you want it to go for your wraps. So begin with a nice loose circular loop like this as you begin to wire wrap.
As you get closer to doing your wrap your circle will get smaller and tighter until you can pull it snug into a wire wrap.
If you would like to make a nice circular "cork screw" looking wrap around chain or other materials you can easily bend the wire around your finger and shape it until the desired look is achieved.
Here is an example of the "Cork Screw" type wrap about which I am talking.
Ending your Wooly Wire
Now onto the ends and finishing your end of Wooly Wire.
When you come to the end you will want to take your cutting plyers and snip yourself a little bit of a "tail." Longer than the tail you would cut if you were just wire-wrapping wire.
Next you will take your fray check and add a dot to the end of the wire.
Here you can see the wet dab of fray check on the end.
Hold your piece with one and and with the other take the piece of fray checked ww and twist it "with the grain" of the fibers. You will know which way is "with the grain" because the fibers will get tighter as you twist. If you are not twisting in the right direction the fibers will puff instead.
Next grab your round nosed plyers. Grab the end of the ww and turn into a loop. This will "lock" in the fibers and secure the wire.
Now grab your bent chain nosed plyers and pinch that little loop you made to further secure the wire.
Next using your chain nosed plyers "tuck" the wire wrap into itself to finish up the wrap like you would for a normal wire-wrap.
Add another dab of fray check to the finished wire-wrapped end.
You will have a little fuzzy from the end of the fiber wire. You can take your finger and now gently rub the fibers into the direction of the ended wire-wrap. You can let this try and then come back and add another drop of fray check and rub the end against the wrap if you still have some fuzzys that stick out.
I hang my earrings or leave my necklace flat to let the fray check dry several hours or over night. Once it is dry you will see the fiber has blended into the rest of the wrap and the fiber is still soft, but secure :D
I hope this quick tutorial has helped you learn how to end your Wooly Wire!
Enjoy!
xo Genea


4 comments:
thank you!
You're welcome Cheri! I hope you are enjoying working with Wooly Wire as much as I am! I am so addicted! xo Genea
Thanka! Perfect timing, just bought some FiberWire and was a little worried about how to deal with the ends. Love the beautiful pieces you made with your beads and Nellie's wire!
Thanks for stopping by Kari! Oh perfect! So glad I could help! I will actually be doing a Wooly Wire review and post of my designs here coming up. I just thought it was so important to know how to end it that I thought I would post that blog first ;) Thank you for your kind words! xo Genea
Post a Comment
Thank you for your comment. I love it when you share your thoughts with me :)