
Hello friends!
I have some new discoveries to share with you. I am always amazed at just how much I learn every time I sit down at the torch. It's also amazing how much things can change from each time I sit down. Things that may have worked from the last session may not work in the next session due to slight changes in your environment.
So what is today's topic? Creation is Messy opal glasses. You know those amazing translucent watery opals that only Creation is Messy makes.

Here are some of the glasses about which I am talking. I just LOVE their watery, oceany blue and green opals!
So how do you work theses amazing glasses? How do you keep them clear or get them to be "cloudy"?

When working with these glasses you may have had some of these results. In the photo from left to right: CiM Atlantis unstruck, CiM Atlantis struck, and CiM Kryptonite "partially cloudy" (partially struck). So what you may also have noticed is that some colors are more finicky than others. For instance Atlantis, is definitely one of those colors.
So let's take a look at the rods first.

Here are two different batches of CiM Atlantis. The rod on the bottom is from an older batch I had and the rod on the top is from a newer batch I have received. As you may notice the top rod is a bit more "cloudy" looking and not as translucent. It looks similar to the Wing Ding pictured above that has been "struck".
It was brought to my attention by Kathy of CiM that the
rods in the entire run of glass from the pot can be different from the rods that are pulled first to the rods that are pulled last. Did you know that there are so many variables in glass that can change the color? Even slight changes in humidity can effect the glasses hue. Crazy huh? It's a wonder anyone can get each batch of glass to turn out the same!
If you have ever had the good fortune of hand
picking your glass you will notice that when you look in the box of glass you
can see a difference in color across the large box. So that being said, when
you place an order in which your glass picked for you, you may receive rods
that were the first to be pulled or last to be pulled causing a different color
or opacity. So when ordering your glass you may want to specifically ask for certain characteristics in your glass. This is just something I have learned from ordering so that is my little tip to pass down to you ;)
In my experience the rods that look the most translucent
seem to stay that color. Rods that look slightly more cloudy seem to strike
cloudy more easily.
So the next thing to address is torch working environment and kiln temperature. Below are the "settings" I use in my working environment that have worked for me.
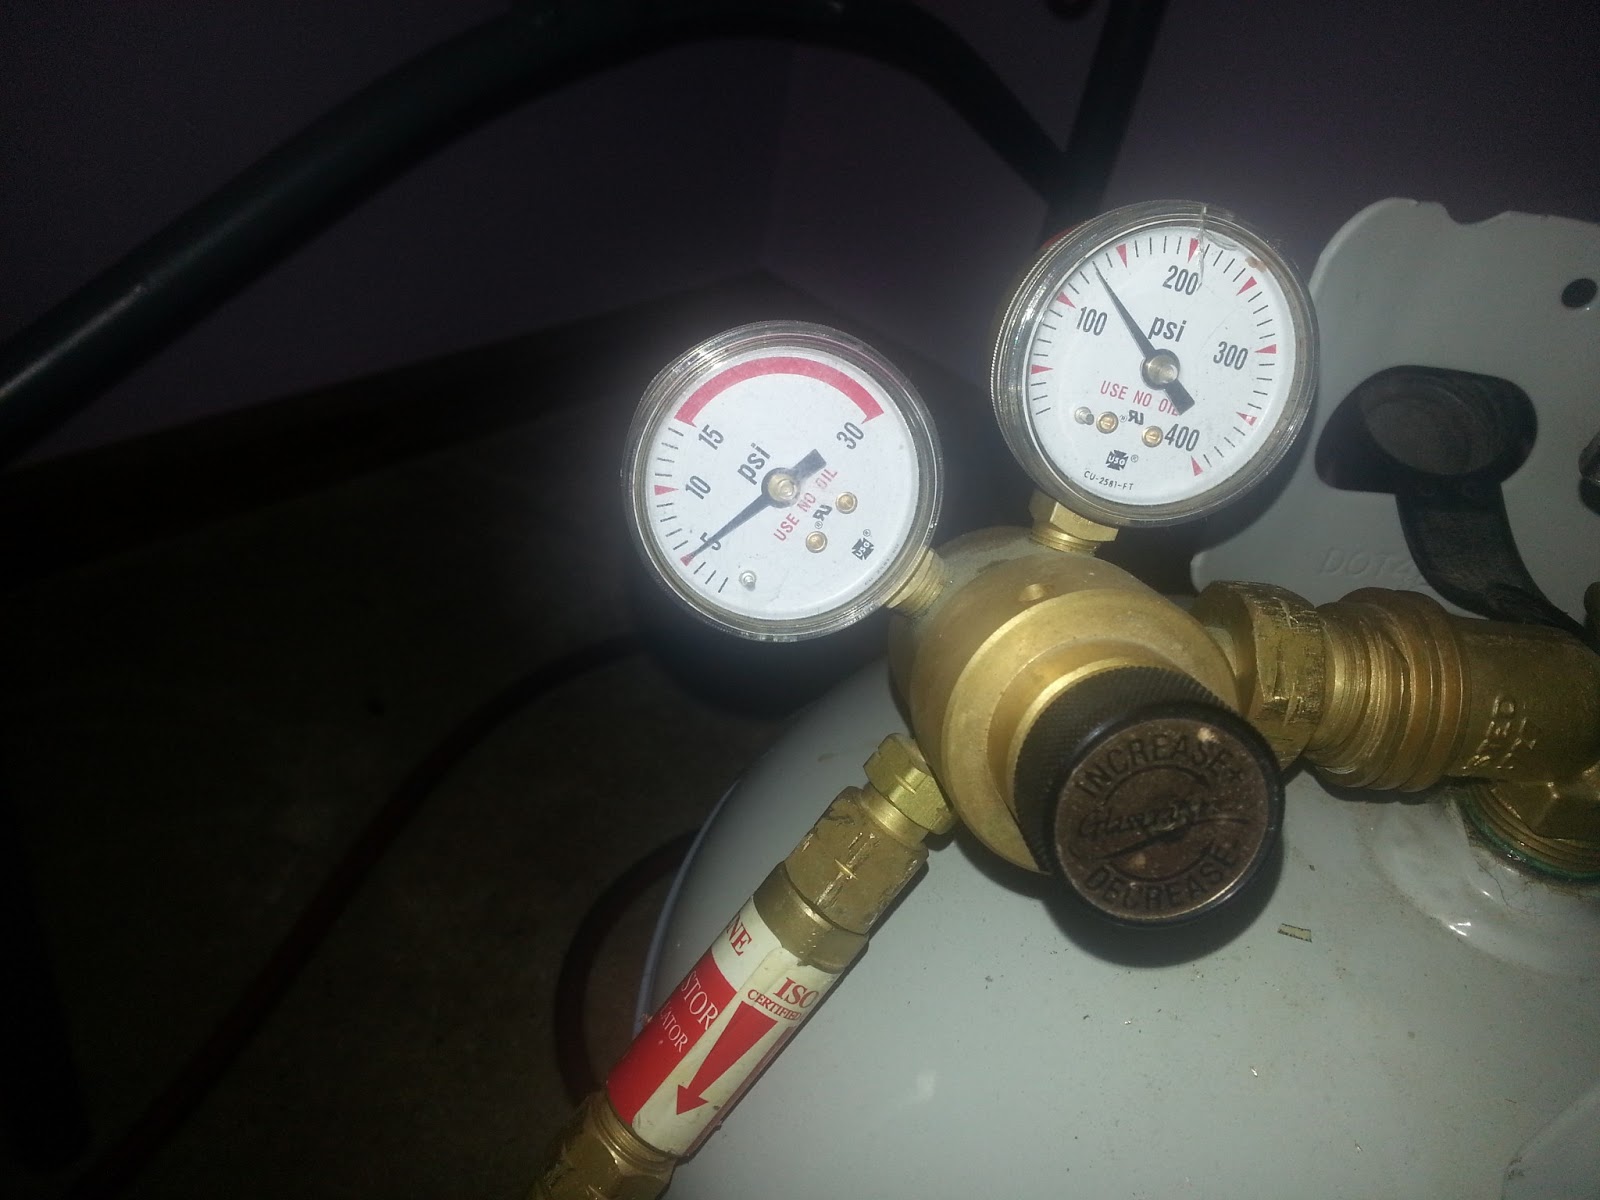
It seems that you want to keep your propane at 5. Higher or lower seem to effect the colors for me.
 I also keep my oxygen knob open so that I am at the max amount for my concentrator as well keeping it right at the point of that little arrow.
I work my glass in a slightly oxidizing flame. As you can see it looks narrow like this.

I work my glass about here in the flame. You want to be slightly above the normal working area for other glasses. You want to try to keep the glass cooler when you work it.
When working the glass if you give it a lot of direct high heat it will strike cloudy. If you want your glass to stay more opal you want to keep the heat even while working on your bead. Heating and cooling the glass multiple times will also strike the glass. If you want to shape your glass in a mold or with tools you will want to keep the pressing or shaping to a minimum as well. So for pressing your beads you will want to try to give the bead one good press if possible.
The other thing I have noticed when working the glass is my kilns temperature.

I have a kiln from The Glass Hive. My annealing program is set to anneal at 950.

It seems to me that my kiln is hotter towards the controller box than it is on the far right side. I am not sure if it's supposed to be this way, but this is just my guess.
Normally I stagger my beads like this having one bead go over the top of my rest and the next bead go under the rest. When making my opal wing dings I noticed that this staggering actually STRUCK my glass from the KILN DOOR OPENING AND CLOSING! The rush of cool air from opening the kiln door along with the hot temps of the inside of the kiln cause the glass to strike and become "cloudy". This is the very same thing that happens in your flame from heating and cooling the glass! Ugh! *Derp* I guess that would make sense! So with that in mind the beads really need to be as far inside the kiln as possible so that the temperature around them stays even.
I have also noticed that putting my beads in the kiln on the far right in the inner most part of the kiln keeps them more opaly. So really my "safe zone" for opal glasses is like 3/4 of the way into the kiln and all the way to the right. The closer I get to the middle the more I have had things strike. So the other tip I will do for very finicky colors like Atlantis is to wait to work those colors at the end of my lampworking session. I will put those beads on the far right in the inner most part of the kiln. The idea behind working them last is that they will have less kiln door opening and closing on them than the rest of the beads to avoid striking. I didn't have a photo of the "safe zone", but you can kind of tell where that is based on where your kiln doors close ;)
So is this a "fail safe" method? Unfortunately, no. Rods also have a role to play in whether you will have opacity problems or not, BUT these little tips may help to yield better results.
I hope that my findings will help you when working these amazing glasses :)
xo Genea