
Hello friends!
Today I have some fun beads to share with you inspired by some fabric I used to make one of my "Love Puff" hearts! I am even going to share with you my trials in cane making trying to make the perfect bead to match. Here is the heart that started it all! I kept looking at it and trying to figure out why I loved it so much. It then dawned on me that it was lime green, aqua and orange. Lol, go figure huh? I have this new love for coraly orange since they make the most beautiful glass rods in many, many different varieties.
I used the following glass for all of the beads below. Messy Creamsicle(orange), Messy Smurfy(aqua), Messy Mermaid(teal), Messy Soylent(grass green), Messy Elphaba(lime green) and Messy Clear.
Before we get super in depth into my testing results, lets hop over to the shop and see what new goodies are there!
NEW IN THE SHOP.....
 Here are my "Fruit Rind- Stripes" beads. I used the colors form the above fabric to make this fun set of encased stripe beads. The colors are orange, aqua, lime green, teal, and grass green. I chose to make this style beads because a lot of the greens are very reactive and "mushy". They tend to "frazzle" giving them this organic look. They like to swallow dots and do all sorts of things so they don't all "play nice" with eachother. I also like the way this set mimics the starburst pattern on the fabric. How did they get their name? The stripes also reminded me of the stripey rind of a watermelon :)
 "Fruit Rind- Spots and Stripes"- Here is a fun little set of 3 beads. A freckly striped focal bead and two freckled spacers. Colors are: Lime green, teal, aqua, and orange.
 "Fruit Rind Freckles"- What are beads without some fun spacers?! This little set of 5 teeny clear spacers are so much fun with their freckles of: orange, lime, teal and aqua.
 "Chubby bubble button- Fruit Rind"- What is a series of beads without a button clasp?! This cute little flower bubbly button has a mirrored button dot in the center and little creased petals in orange. The shank is lime green with freckles of teal. What a perfect button for a clasp or closure for other creative projects.
How much fun could you have by putting this whole super set into a design? LOTS! :) The stripe rounds would make an awesome bracelet or necklace with the spotty spacers. You could make a pendant and earrings with the mini set and the button closure could finish off the clasp for the bracelet or necklace!
So now you are probably wondering about my trails in design right? Ok well let's go take a look at the tests and see what we got.
COLOR AND CANE TESTING....
All but 2 of the test beads were made with a base of Messy Creamsicle. The other base color for beads 2 and 3 are effetre odd Peach Coral which is no longer is stock. You may be able to find stashes of it around by checking the garage sale on LE or just doing a web search.
 The original design idea was to make a set on Messy Creamsicle with flattened melted in starburst cane dots with the above color combinations like in the love puff heart.
Bead #1- Base of Messy Creamsicle with a starburst cane made with Messy Soylent and Messy Elphaba. As you can see the cane does have the little starburst in it, but is very organic and frazzly looking. Not quite the crisp starburst I was looking for for my design. I wanted the starburst to be more pronounced. The can was applied to the surface, melted off, flattened, melted into the surface, poked in the center and then melted flat.
Bead #2- Base of effetre odd Peach Coral with a Creamsicle core, encased in Messy Elphaba with effetre Light turquoise stripes. For some reason it's not loading Frantz Art Glass' page for me so I don't have an attached link for the effetre color. The application for this cane dot was placed by heating the cane, flattening it to the surface melting off the cane and then melting into the surface. As you may have noticed the cane is off center and kind of looks like tye-dye jelly fish.
Bead #3- effetre Peach coral base with the cane from #2's description. Cane application was heating the beads surface, plunging in the cold cane, then breaking the cane off, and melting into the surface.
Bead #4- Creamsicle base with a starburst cane out of Messy Elphaba and effetre Light Turquoise. Cane is applied by melting a dot onto the surface, flattening the dot, melting it into the surface, poking the center, and melting flat. You can see the stripes- there is some chemical reaction ghosting, but it looks like the light turquoise and creamsicle have a dark line reaction.
Bead #5- Messy Creamsicle base with #4's cane. Cane applied by melting in dot, flattening, melting flat and then poking the center. Added a dot of Messy Mojito to provide the encasement and enhance the color of the blue and green cane. Still not quite the effect for which I was going. It seems that the Mojito isn't a saturated enough color to enhance the green and blue.
Bead #6 Messy Creamsicle base with a starburst cane in Messy Elphaba and Messy Mermaid. Cane application was a dot added to the surface, melted off, flattened, melted flat and then poked into the center. You can see that Messy Mermaid and Creamsicle have a dark line chemical reaction.
Bead #7 Messy Creamsicle base with a large dot of Messy Mermaid with a cane dot of Elphaba and effetre Light Turquoise starburst cane. Mermaid dot is organic with a bit of a curdled effect and a dark outline. Cane starburst is stripey, but hard to see.
Bead #8 Messy Creamsicle base with Mermaid dots. Cane dots of Messy Elphaba and effetre Light Turquoise. Little accent dots of Messy Unique Pumpkin were added for interest. The Mermaid has an organic curdled look and starts to "swallow" the cane dots.
Bead #9- Creamsicle base with a starburst cane of Messy Elphaba and Peach Coral. Stripes are visible, but not crisp and clear.
Bead #10- Creamsicle base with a new cane and cane style. Cane is made like a Corina style vine cane where the Elphaba core is creased with a tool. Thick stringers of Light Turquoise are put into the creases. I then melted this flat(which is not in Corina's instructions, but what I do so that you don't trap air bubbles when you encase the cane), then encased in effetre Light Grass Green. This can is applied to the surface by melting a dot and pushing the glass flat on to the surface with the cane, then pulling away and cutting the cane with the flame. All cane dots are applied in this fashion. Then I used a medium stringer of Messy Unique Pumpkin to heat and poke the centers of each cane dot. I then broke of the stringer and melted the whole cane dot into the surface. As you can see when the cane was melted into the surface the effetre Light Grass Green left ghosting lines on the Creamsicle base. Encasing in green still didn't keep the Light Turquoise lines from making a dark line when they met the Creamsicle surface.

Bead #11- This is the bead pictured on the heart. This cane was placed on a base of Creamsicle and applied in almost the same fashion, but the difference was after placing the cane dots and flame cutting the cane I used a plyers to pinch off a tiny bit more glass from the center of the cane dot. I then heated the can dot and pushed the cold stringer into the center, broke off the cane and then melted the whole cane dot into the surface. This produced the sharpest defined line starburst with a cool dot center. Can you believe it took that many tests and beads to get the desired effect for my bead? Didn't realize that lampworker's go through all that work to make beads did ya? ;)
Well I hope all of that made sense lol. I guess it will make more sense to the people out there that lampwork, but it gives the rest of you an idea of the process of canemaking, application and finished beads. :)
WHAT ELSE IS NEW?....
Well I did make my Calorimetry out of cotton for the spring and summer. As you may know wool is WAY too hot for the warmer time of year. Well I did indeed get it made, but I f*d up the pattern. My knitting guru told me different directions than the pattern! I can still wear it, but as you can see from the glass button it's fastened up the side of the hat instead of at the ends. Incase you wondered the glass button is made from Messy Great bluedini, Mojito, and Sapphire. Now you may notice all that you can visibly see if Great Bluedini because it's so saturated, but they are all there, I assure you ;)
Well this concludes my update for the week. Have a great one!
Much love,
Genea
Today I have some fun beads to share with you inspired by some fabric I used to make one of my "Love Puff" hearts! I am even going to share with you my trials in cane making trying to make the perfect bead to match.
 Here is the heart that started it all! I kept looking at it and trying to figure out why I loved it so much. It then dawned on me that it was lime green, aqua and orange. Lol, go figure huh? I have this new love for coraly orange since they make the most beautiful glass rods in many, many different varieties.
I used the following glass for all of the beads below. Messy Creamsicle(orange), Messy Smurfy(aqua), Messy Mermaid(teal), Messy Soylent(grass green), Messy Elphaba(lime green) and Messy Clear.
Before we get super in depth into my testing results, lets hop over to the shop and see what new goodies are there!
NEW IN THE SHOP.....
 Here are my "Fruit Rind- Stripes" beads. I used the colors form the above fabric to make this fun set of encased stripe beads. The colors are orange, aqua, lime green, teal, and grass green. I chose to make this style beads because a lot of the greens are very reactive and "mushy". They tend to "frazzle" giving them this organic look. They like to swallow dots and do all sorts of things so they don't all "play nice" with eachother. I also like the way this set mimics the starburst pattern on the fabric. How did they get their name? The stripes also reminded me of the stripey rind of a watermelon :)
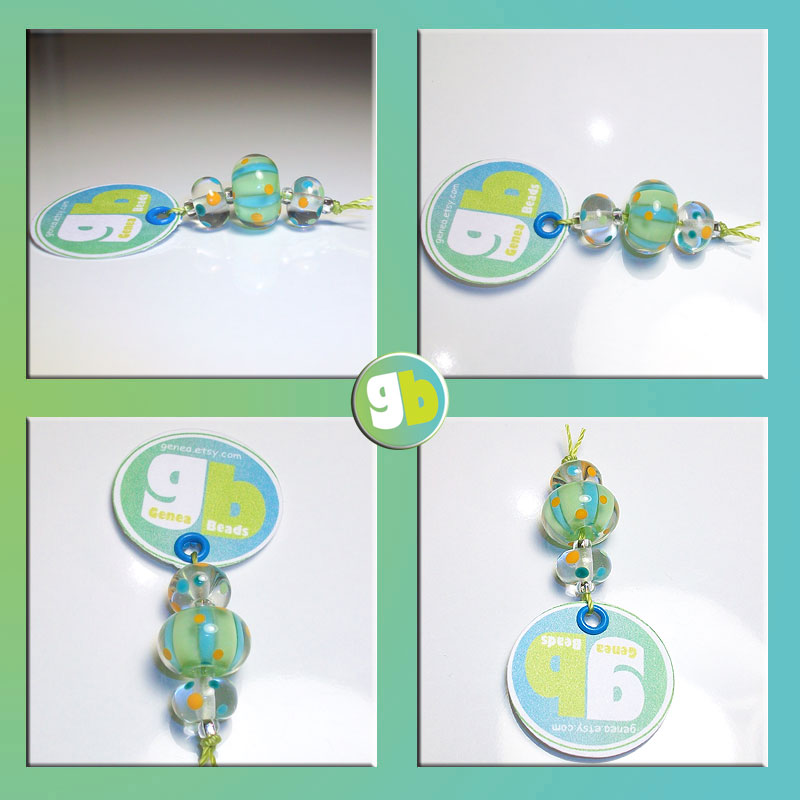 "Fruit Rind- Spots and Stripes"- Here is a fun little set of 3 beads. A freckly striped focal bead and two freckled spacers. Colors are: Lime green, teal, aqua, and orange.
 "Fruit Rind Freckles"- What are beads without some fun spacers?! This little set of 5 teeny clear spacers are so much fun with their freckles of: orange, lime, teal and aqua.
 "Chubby bubble button- Fruit Rind"- What is a series of beads without a button clasp?! This cute little flower bubbly button has a mirrored button dot in the center and little creased petals in orange. The shank is lime green with freckles of teal. What a perfect button for a clasp or closure for other creative projects.
How much fun could you have by putting this whole super set into a design? LOTS! :) The stripe rounds would make an awesome bracelet or necklace with the spotty spacers. You could make a pendant and earrings with the mini set and the button closure could finish off the clasp for the bracelet or necklace!
So now you are probably wondering about my trails in design right? Ok well let's go take a look at the tests and see what we got.
COLOR AND CANE TESTING....
All but 2 of the test beads were made with a base of Messy Creamsicle. The other base color for beads 2 and 3 are effetre odd Peach Coral which is no longer is stock. You may be able to find stashes of it around by checking the garage sale on LE or just doing a web search.
 The original design idea was to make a set on Messy Creamsicle with flattened melted in starburst cane dots with the above color combinations like in the love puff heart.
Bead #1- Base of Messy Creamsicle with a starburst cane made with Messy Soylent and Messy Elphaba. As you can see the cane does have the little starburst in it, but is very organic and frazzly looking. Not quite the crisp starburst I was looking for for my design. I wanted the starburst to be more pronounced. The can was applied to the surface, melted off, flattened, melted into the surface, poked in the center and then melted flat.
Bead #2- Base of effetre odd Peach Coral with a Creamsicle core, encased in Messy Elphaba with effetre Light turquoise stripes. For some reason it's not loading Frantz Art Glass' page for me so I don't have an attached link for the effetre color. The application for this cane dot was placed by heating the cane, flattening it to the surface melting off the cane and then melting into the surface. As you may have noticed the cane is off center and kind of looks like tye-dye jelly fish.
Bead #3- effetre Peach coral base with the cane from #2's description. Cane application was heating the beads surface, plunging in the cold cane, then breaking the cane off, and melting into the surface.
Bead #4- Creamsicle base with a starburst cane out of Messy Elphaba and effetre Light Turquoise. Cane is applied by melting a dot onto the surface, flattening the dot, melting it into the surface, poking the center, and melting flat. You can see the stripes- there is some chemical reaction ghosting, but it looks like the light turquoise and creamsicle have a dark line reaction.
Bead #5- Messy Creamsicle base with #4's cane. Cane applied by melting in dot, flattening, melting flat and then poking the center. Added a dot of Messy Mojito to provide the encasement and enhance the color of the blue and green cane. Still not quite the effect for which I was going. It seems that the Mojito isn't a saturated enough color to enhance the green and blue.
Bead #6 Messy Creamsicle base with a starburst cane in Messy Elphaba and Messy Mermaid. Cane application was a dot added to the surface, melted off, flattened, melted flat and then poked into the center. You can see that Messy Mermaid and Creamsicle have a dark line chemical reaction.
Bead #7 Messy Creamsicle base with a large dot of Messy Mermaid with a cane dot of Elphaba and effetre Light Turquoise starburst cane. Mermaid dot is organic with a bit of a curdled effect and a dark outline. Cane starburst is stripey, but hard to see.
Bead #8 Messy Creamsicle base with Mermaid dots. Cane dots of Messy Elphaba and effetre Light Turquoise. Little accent dots of Messy Unique Pumpkin were added for interest. The Mermaid has an organic curdled look and starts to "swallow" the cane dots.
Bead #9- Creamsicle base with a starburst cane of Messy Elphaba and Peach Coral. Stripes are visible, but not crisp and clear.
Bead #10- Creamsicle base with a new cane and cane style. Cane is made like a Corina style vine cane where the Elphaba core is creased with a tool. Thick stringers of Light Turquoise are put into the creases. I then melted this flat(which is not in Corina's instructions, but what I do so that you don't trap air bubbles when you encase the cane), then encased in effetre Light Grass Green. This can is applied to the surface by melting a dot and pushing the glass flat on to the surface with the cane, then pulling away and cutting the cane with the flame. All cane dots are applied in this fashion. Then I used a medium stringer of Messy Unique Pumpkin to heat and poke the centers of each cane dot. I then broke of the stringer and melted the whole cane dot into the surface. As you can see when the cane was melted into the surface the effetre Light Grass Green left ghosting lines on the Creamsicle base. Encasing in green still didn't keep the Light Turquoise lines from making a dark line when they met the Creamsicle surface.

Bead #11- This is the bead pictured on the heart. This cane was placed on a base of Creamsicle and applied in almost the same fashion, but the difference was after placing the cane dots and flame cutting the cane I used a plyers to pinch off a tiny bit more glass from the center of the cane dot. I then heated the can dot and pushed the cold stringer into the center, broke off the cane and then melted the whole cane dot into the surface. This produced the sharpest defined line starburst with a cool dot center. Can you believe it took that many tests and beads to get the desired effect for my bead? Didn't realize that lampworker's go through all that work to make beads did ya? ;)
Well I hope all of that made sense lol. I guess it will make more sense to the people out there that lampwork, but it gives the rest of you an idea of the process of canemaking, application and finished beads. :)
WHAT ELSE IS NEW?....
Well I did make my Calorimetry out of cotton for the spring and summer. As you may know wool is WAY too hot for the warmer time of year.
 Well I did indeed get it made, but I f*d up the pattern. My knitting guru told me different directions than the pattern! I can still wear it, but as you can see from the glass button it's fastened up the side of the hat instead of at the ends. Incase you wondered the glass button is made from Messy Great bluedini, Mojito, and Sapphire. Now you may notice all that you can visibly see if Great Bluedini because it's so saturated, but they are all there, I assure you ;)
 Well this concludes my update for the week. Have a great one!
Much love,
Genea


