Third Eye Gypsy(Genea Beads) 2011 by Parigo Studios 2010

Thursday, October 11, 2012

New in the shop- "Bright Earth" Weeny Dings and "Rainbow Spiral" S-Clasps!

Hello friends!

I was really excited to update the shop today! I cranked out some more wonderful weeny dings in your favorite color palette, "Bright Earth" and got a wonderful selection of S-LG "Rainbow Spiral" s-clasps in the shop!


Since it's been awhile, here is a refresher of the size of "Weeny Dings". 

"Bright Earth" Weeny Dings. I just LOVE this tiny size in my(and your) favorite color palette! Perfect for so many things like earrings, dangles or whatever design tickles your fancy!


Check out this GORGEOUS design by Lorelei! I just love her tin focal with the weeny dings! Here is a link to the bracelet.

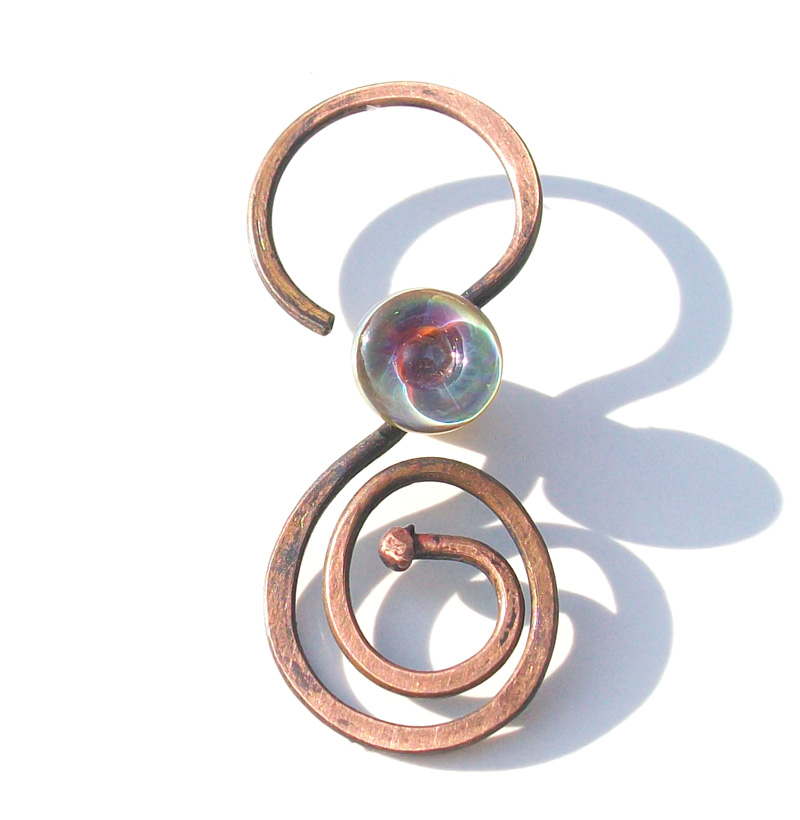
Here are the "Rainbow Spiral" S-Clasps. Sizes are from left to right: Small, Schmedium(what else do you call an inbetween size?!), Medium, and Large.
Here is a look at the sizes in my hand .


So you know the whole reason I had an idea to create this clasp was for a new design, right?! Here you can see the clasp in action! Patinated chain is by Karen Totten.

Here is my new design that will be going in my jewelry shop soon(www.geneack.etsy.com). You can also look forward to seeing my NEW "Ocean Serpent Egg" focals in the shop coming soon!

Thanks for stopping by!

Have a fantastic remainder of the week!

xo Genea

Sunday, October 7, 2012

Rainbow Spiral "S-Clasp"- the REVEAL

Hello friends!

Well I have dipped my toes into the pool of glass and metals. Now mind you this is just the beginning. Staci was kind enough to walk me through some of the tools I would need to do some simple soldering and metal work.I have only collected a few pieces, but this is the start.

I was actually inspired by make this new clasp by a design I was creating :D I needed a clasp and I was going to use one of my FAVORITE Spiral "S-Clasps" from Staci, but then I had the idea to make one with GLASS on it! I came up with this idea as I was laying out my design on my bead mat before bed. I scribbled down the idea and then went to sleep. 

So upon waking I had to try out my new idea! I was pretty certain it would work. I actually took step-by-step photos and think maybe I might turn this into a tutorial. For now I will just fill you in with some of the steps so you can really appreciate the process :)(you know how I love my process!) I even did a short VIDEO of the glass part of this process. You really can't see the detail, but I had some friends tell me I needed to do a video of me lampworking ;) Luckily I jerry rigged my broken tripod enough to do a quick video. 

So here we go...
So first you need to "draw a bead" with some copper wire.
Then it has to be wired up to work the glass onto them. 

 
Here is the video of me putting the glass on the wire :D
Here are all of the glass pins waiting to be made into clasps. Aren't they PRETTY?! They are like my little soldiers <3 p="p">
Next the clasps have to be bent into shape.
Hammered....
The run of claps waiting to be patinated.
Cleaned.
Patinated.
Dried.
Buffed(like the boob shot? Lol. I had to rest the camera under my chin and on my chest to get both hands in the photo!)


Lacquered(twice. This takes 2 hours to dry each time).

Drying.

FINISHED!

Just a really cool shot of my table while I was working. It was very picturesque so I had to click a pic.


I can't wait to show you the BEADS and DESIGNS I am working on for which I made the clasps! :D I will also be getting some of the finished clasps up in my shop soon!

See you soon!

xo Genea

Cleaning, Patinaing and Coating Copper Wire Tutorial

Hello friends!

I have just dipped my toes into the pool of metals and I learned SO much so I thought I would share my findings with you :)

**DISCLAIMER**Remember to wear protective eye wear, gloves and work in a well ventilated area. Be sure to CAREFULLY  follow instructions on chemicals and sealants. Genea Beads(Genea Crivello-Knable) is NOT responsible for mis-use or injury from these products.** 

This tutorial is simply showing you the process of patinaing and coating metal and will NOT produce a finished product.


MATERIALS
protective glasses
ventilation
gloves
clear guard sealant(8oz "normal" class matte) From Sculpt Noveau
Renaissance Wax(Fallen Angel Brass) *optional
copper wire(jump rings whatever you want to patina)
1/16th mandrel(A piece of wire, hanger, or what you can find will work for a drying rack)
sos pad
baking soda
warm tap water(DO NOT BOIL)
liver of sulfur gel- XL GEL(1fl oz. bottle)
Work surface(tray, tile, glass plate etc)
3 small containers with large mouths(bowls, glass bottles etc for solutions)
plastic spoon
plastic fork
ammonia
old tooth brush(only used for cleaning)
paper towel
liquid dish soap
item to cover patina solution container(lid what ever you have to cover your solution container)
 2 pieces of wire to bend into a hook(this can be any scrap wire you have lying around)


For this tutorial I am using one of my NEW glass "Spiral Rainbow" S-clasps.Keep an eye out for these in the shop soon ;)


**ALL of these instructions for mixing your solutions come with the Liver of sulfur gel.**

First you will need to get one of your small containers(mine was a bowl from the dollar store). I would personally get some short squat mason jars with lids as you can save some of these mixed up solutions for later use. I just used what I had on hand. Grab your: gloves, work surface, paper towel, ammonia, water, dish soap, warm water, and tooth brush. The cleaning solution is: 2 cups warm water, 1 tsp liquid dish soap, and 2 TBS of ammonia. Put on gloves, mix solution, and scrub your pieces with a tooth brush. Rinse with water and dry on a paper towel. 

Grab another container. Mix your Neutralizing bath: 2TBS baking soda to 2 cups of warm water. Stir with your plastic spoon to dissolve. Set aside.

Grab your last container. Mix LOS- 1-2 cups of very hot water  and 4-8 drops of patina gel(DO NOT BOIL the water and patina it will EMIT TOXIC FUMES!) The solution will be lemon yellow.  Cover when not in use to preserve the temperature of the solution. Warm solution will yield best results.

Next take your items to be patinated and put them into the LOS bath. In the instructions it tells you to put them on a piece of wire and dip them, but I just put mine in the solution. You can see them turn black. Pull out our pieces when the desired color is seen.
Here is the "S-clasp" in the LOS solution. Once the desired blackness is achieved, remove your piece from the LOS solution with a plastic fork or spoon and put it in the neutralizing bath. Your LOS solution will deteriorate once it is mixed. Once you are done using your solution you can set your container aside and cover. Once the solution has turned to a milky white it is safe to dump outside on the grass.
Leave your piece in the bath for a few moments. Remove with a plastic fork. Rinse in clear water.
Set your pieces on a paper towel to dry.


You can highlight textured areas and remove oxidation from the high spots with a light abrasive such as baking soda. You can wet your thumbs and dip them in baking soda and rub them on your piece.
You can also take your sos pad and buff up shiny spots.( This photo was taken by me by resting the camera on my chest and chin. Lol. It worked, right?!)


You should be wearing gloves through this whole process, but as you can see I am not in this photo. SHAME on me! Grab your clear guard and 2 wire hooks you made to hold your piece. You can either hold the top and dip the bottom, then slide your bent piece of wire hook in the dipped part and dip the other side, or you can make a second wire hook to hold the piece as you dip and use the other hook to grab the dipped side. 

You will notice that when you dip it it's like dipping a bubble wand. I held my piece with both wire hooks, put it over the clear guard lid and blew on the spot in the spiral that held the lacquer to keep the liquid from sitting in places I didn't want. Be careful not to breathe in the fumes. I also tapped the piece on the inside lip of the can to get it to drip off excess lacquer. 

I made a make shift drying rack by balancing a 1/16th mandrel on a bowl bottom and the edge of my desk. You can rig up whatever you need to to make a drying rack. You will need to let the lacquer dry for 2 hours before applying another coat. I did 2 coats on my hooks.

NOTE- if you are patinaing other metals with lots of patina such as verdegris this is where you may want to coat your piece in 2-4 layers of clear guard and then add some ren wax. I personally have not used any other patinas at the moment, but this is what I was told works from other artists I trust :)

I hope you enjoyed my short tutorial on cleaning, patinaing and coating copper. 

Be SAFE and have fun!

I had a BLAST making my pieces!

I will be blogging about the birth of the "Rainbow Spiral" S-hook in another blog( even took a short video!).

See you soon!

xo Genea

Thursday, October 4, 2012

"Sea Horse" hearts in the SHOP!

Hello friends!

I am excited to have listed the "Sea Horse" hearts in the shop. If you missed the blog about the birth of the "Sea Horse" hearts you can read it here.
Here is a group shot of all of the Sea Horse hearts together :)


Here is a photo that demonstrates the size. The ones I have that are available are the smallest heart(the black heart) and the large hearts(heart on the right). All of the medium sized hearts have found homes already :)


Sea Horse Heart "Sand Serpent" I just LOOOOOOOOOOVE this color! Its a wonderful golden yellow and it's very striking with the snakes of rainbow!

Sea Horse Heart "Desert Serpent"- Mmmm what's not to LOVE about dark ivory? It has the most wonderful "webbing and curdling". You can see some of those effects on the left cheek by the fin. I love adding those watery pool shimmery spirals too. Yum!


Sea Horse Heart "Midnight Serpent"- Gotta love classic black since it really showcases the brights of the rainbows and the intricate webbing of the ivory and black. This size is very nice for that really amazing focal, but something that is also nice and light.

Sea Horse Heart "Rust Serpent"- Who doesn't LOVE rust? Yeah, that is what I thought. This wonderful earthy reddish brown is so perfect for this time of year. I love it with the contrast of the ivory snakes and don't you just adore this kind of stair case swirl twist going up the left side of the heart?

Thanks for stopping by to check out the hearts. I hope you find one you love!

In other news...

I have been on a roll in this style so I have been creating some more focals, beads, headpins, spacers and a very special clasp! I actually got to creating some other pieces for a design I had in my head. What is a great design without some other matching beads?! I can't wait to tell you about my new designs next week!

See you soon!

xo Genea

Monday, October 1, 2012

"Sea Horse" Hearts! My newest and most incredible feat in glass to date!

Hello friends!

Ok well I guess it's time to tell you what I've been up to. I hate to spoil the surprise after just making one bead or post in text what I will be working on. It tends to bite me in the butt, so I have been keeping things a secret. I had wondered if I should tell you now or wait to show you a whole collection of beads. I have had a few people asking and I can't keep exciting secrets to save my life! 

So here's the story. As you may have read a few days ago I freaked out. I had been doing a run of weeny dings and had all these plans to stock up my shop full of wing dings and weeny dings. I had  a few other projects on my list too. I kept trying to push on trying to re-stock, but I just couldn't. Beads weren't turning out. I was bumming because I kept seeing people post new work. I wanted to make ideas I had had in my head forever. Finally I panicked and stopped EVERYTHING. If I didn't stop what I was doing an "artist's funk" was surely in store for me. If you have never experienced one be glad. Sometimes this crappy uninspired feeling will last for MONTHS. Ugh... totally don't need that after my kiln being down for 2 weeks and then me being sick.  

So I just said F* IT and did what I wanted to. I had tried a few little tests to see if my idea was even possible. So here it goes...

So as you may know, I am totally in love with MAKU's hearts and Staci's.
MAKU hearts.
Staci's hearts, which were inspired by MAKU's hearts :D
Ok so the first step was to see if my glass idea would work. Here were some simple tests to find out. 


Here were some quick doodles for ideas. Originally I had wanted to make some glass enameled pins, but upon thinking about this idea it would be much easier to just put a blob of glass on the wire. So how could I take the inspiration I had, translate it into glass and make it my style?

So I laid out my arsenal of elements to give this idea a whirl.

I created the FIRST two "Sea Horse" hearts! OMG Look! It worked! Not only did it work, but look how AMAZING they are! 
Here is a shot of the dots on the wire. They have a trapped air bubble of course since I just LOVE to add that element. It was one of my favorite things I learned when I was first making beads :D

So after this SUCCESS surely I needed to make more!  So off to work I went....

Now what colors to use??? Hmmmm well Dark Ivory is always  a MUST, but which other colors? I asked Ricky and my sweet, sweet husband replies, "What about Red Roof Tile"? I love it when my hubby speaks glass to me. I guess that happens after 9 years of bead making and 5 years of being married ;) What a great idea! 
Oooooo AMAZING!
My palms were sweating and my heart was RACING.. 


Ooooo so awesome!
Gotta keep going...

Now for another of my very FAVORITE COLORS(and seems to be everyone elses too), Stone Ground! OH.... MY.... GOD... Look at how GORGEOUS this is!
WHOA... Just look at that COLOR. 

BUT..... with all great things comes CRISIS. The most DREADED sound ever to hear while you are lampworking. All lampworkers ears are fine tuned to this one little particular sound. When you hear a little *tink* while you are working that is BAD. That is the sound of glass cracking. So I did hear it a few times as I worked, but thought surely it must be the little dots of glass on the metal pins, right?  WRONG.... Dead WRONG. So where were those cracks?


At the bottom cone part of the heart! *dies* :'( I can only make about 3 hearts in one sitting. They are pretty intense as soon as I create the fin and add on the little "antenae". So surely those would be the delicate things, right? Nope, it's the cone. So why is it that this is happening? 

So lets take a look. If you notice. You will see that the glass is the thinnest at the cone's base. The rest of the heart is super thick with a lot of mass. So as I was neglecting the bottom of the heart so worried about my "sticky outies," it was therein that laid the problem. 

I was HEART BROKEN... literally and metaphorically. The one in the picture above was my FAVORITE.. I might even say it was my "Preciousssssssssssss". 
I mean, LOOK at it... Oh *sigh* such a bummer :(

So dismayed and disbeliefed at 
 this horror I HAD to try again. I am a very determined person, so this was NOT going to stop me. I would just try harder and remember to really make sure to give the bottom of the heart some good heat inbetween keeping everything else warm.

Here is the entire run of "Sea Horse" hearts I created :D Aren't they amazing?! As you can see I had better success my second time around! Thank God! 


 Here you can get an idea of the size of the hearts. So you can expect to see these GORGEOUS beads in the shop later this week!

I am really digging this theme so I have created even more amazing beads today! I hope to make a lot more this week.

You can expect to see these AMAZING hearts in the shop this week! 

See you soon!

Thanks for stopping by!

xo Genea