Third Eye Gypsy(Genea Beads) 2011 by Parigo Studios 2010

Showing posts with label frantz art glass. Show all posts

Saturday, July 6, 2013

Pickling Lampwork Glass for Crystal Clear Rods

Hello friends!

Today I want to talk with you about pickling glass. Yep, you can pickle glass just like you can pickle metal! Cool huh? So why do we want to pickle glass, you ask? Well, I'm sure in your lampworking career you have had your fair share of scummy disgusting rods. As you know our glass travels a long way before it gets to our studio. It is pulled in glass factories, shipped to distributors, and stocked in boxes on shelves before it gets packed into a box and shipped to our studios. You can imagine the layers of dust, dirt, and grime that can get from it's travels along with the gooey oils from your skin. Now think of melting that dirty oily glass and how pretty that will look if not cleaned. 

So normally you would just wipe down your rods with a clean cloth and glass cleaner or alcohol, right? Well lets do one better and pickle that glass to get it sparkling clean!

None of these tutorials are my own so I will link you up to the ones I have followed and fill you in on how I followed them. So lets take a look at some glass to see the results.
For this example I have used one of my favorite clear glasses, Clear by Creation is Messy. Their clear is VERY compatible with just about every type of 104 glass out there. I have had little to no problems with cracking so it's my go-to clear.

From left to right: Pickled clear, gently worked untreated clear, and just burn the snot out of it and work it hot untreated clear. 

Wow! Look at the difference huh?! Pickling makes a HUGE difference in clarity for sure! You will still need to wipe down your rods with a CLEAN cloth and either window cleaner or alcohol before using because even thought the rods have the grime cleaned off of them the oils on your skin will still make the glass scuzzy if you don't use clean rods.

I used Pat Frantz' tutorial on glass pickling which can be found here. 

BUT.. there were a few things that weren't super specific so I will tell you how I did it. So first you are told to use the pickle according to the box instructions, but use it half strength. If I would have had my postal scale I may have weighed out the amount of pickle in one of those metal beading triangles to get the right amount. Unfortunately when I did this I didn't have a scale. I used a wooden spoon and used 2 large scoops for the pickle. I filled up my baking dish as full as I could get it making sure to leave room for the glass. 

I don't know about you, but I am not really sure how hot, hot coffee is. So what my hubby told me is that you just pretty much want to keep the pickle solution from boiling. The double burner I used was kinda funny with temperature so you kinda had to guess. So that being said you want to keep the heat low to medium. You will have a few little fizzy looking bubbles doing it this way and that seemed to work fine. This will make more sense when you set up your pickling solution. 

The other thing that was not touched on was disposal. So here is an excellent article I found on the Metal Studio Workbook blog telling you more about pickle and how to dispose of it.

While going through a most excellent Pinterest board of gorgeous lampwork beads I also came across Ising Glass Designs blog. She used a natural pickle and seemed to have the same awesome results. You can read more about her experiences on her blog. Personally I would have liked to use the natural method as I hate nasty chemicals. It's nice to know you can still get the same results which ever way you choose!

I hope this helps you with your scummy glass problems. I know I am super stoked to get those normally streaky scummy rods crystal clear! 

Happy Lampworking!

xo Genea

Monday, May 2, 2011

Pat Frantz Dichro Tutorial- My beads

Hello all!

I thought I would share my experiences with you about Pat Frantz new dichro tutorial I received a few weeks back. It took me until just now to get a chance to work on the beads, but I really enjoyed learning something new! Mad respect to dichro bead makers.

Working with dichro takes patience and time. You have to gently heat dichroic glass, glass side facing the flame crystal side facing away. Little heat exposure burns the crystals and the clear they use for dichro gets scummy easily. Also when working with dichro a good bond has to be made with the bead base and dichro or else your glass will crack. It's a wonder people can make beads with it, huh?! lol.

Here is a you tube video Pat did to show you how to make a dichroic lightning bead. She makes it look so effortless! ;) This awesome video should help as a visual aid to demonstrate how the glass is applied to a bead.

Here were my first attempts. I didn't have the proper glass for the tutorial for these beads, but used what I did have on hand before getting the glass in the tutorial. The bead on the left has rainbow 2x 1/4" strip dichro and triton double helix. The bead on the left has rainbow 2 1/4" strip dichro and corkscrew dichro. Both pieces are on a base of Tuxedo.

Here are all of the beads from my first attempt making all of the tutorial beads. I botched the first plain dichro bead and used up the whole strip of pink and had to use other assorted strips of different colors to try out the technique. I didn't do so awesome not burning the dichro! Oops! As dichro melts the crystal layer curves upward pulling itself towards the torch flame and exposes the sides. This is why it's very important to heat the clear side that faces the flame and gently push is down and spread it out to protect the crystals.

You can see I cracked my off mandrel pendant as well :( I did this in the final steps when trying to heat off my punty(a punty is a temporary glass handle(usually it can be metal too) used to hold glass while doing off mandrel techniques. In this instance the tungsten pick I was using to hold the pendant through the hole on the top actually stuck to the glass! Whoops! I was frantically trying to push off the pendant into the kiln before it cooled too much before realizing it was stuck. Bummer cause it was really pretty too!

I ended up cracking my ruffly bead second from the top too. I am thinking I didn't get a good enough bond with the dichro and the base bead.

The top zig-zag bead turned out awesome!
Here is a close up picture.  You can see all of that pretty "oil slick" effect I got with reducing Triton. If you look at the blue zig-zags you can see the shimmery red orange dichro that lies on the top. It's such a cool bead to make and see it all come together. It pretty much has a blanket of shimmer on top of the core design! So cool!

Here is a close-up photo of the back side of the pendant I cracked from it getting stuck to the pick and cooling too much.

Here is my last attempt re-doing the beads I messed up the first time through the tutorial. I managed to get the pendant made, but I ended up trapping some scummy clear under my top layer of square patterned dichro. Dang!
I ended up cracking my ruffle bead again too! Drat! It didn't show the cracks until the next day after annealing. I must not have gotten a good bond again. 

I did FINALLY get my plain dichro bead all encased without scum on that last try too! The color is SO pretty!

Well I hope you enjoyed reading about my experiences. If you lampwork I hope you will go on over and pick up Pat's tutorial and give it a try!

If you want to see the thread I posted on Lampwork Etc. to hear what other people had to say and see how their beads turned out, visit the link here :) Show me your Pat Frantz Dichro Tutorial Beads.

See you soon!

Much love,

Genea


Tuesday, March 8, 2011

New Beginnings- Moving to Portland, Oregon

Hello friends!

I have been waiting for this day.... Now that it's finally happened I am waiting to wake up. About a year ago Ricky and I decided that we wanted to move to the Pacific North West(PNW) . We were thinking Portland, but wouldn't have been upset to move to Washington either. 


So why Portland? Well for several reasons.... Ricky is a personal trainer and health is very important in that area that means lots of opportunity. Kansas City isn't really the healthiest area. It's also the 2nd greenest city in the entire world! You all know how much I love my little green planet! So what's in it for me? Well this area is also a HUGE glass area! The arts are very important! Bullseye and Uroboro's factory's are in Portland and moving there I will be only 2 hours from Frantz Art Glass and Creation is Messy! Talk about AMAZING!

I think I am still in shock. I mean just 2 short weeks ago Ricky decided to just start applying in Portland. He got an overwhelming response and off he went on a place to seek our fortune. Now here we are. He will be working part time at the YMCA doing classes and working full time at 24 Hour Fitness. I will be in the glass mecca. It's just really incredible!  
So the next few month's I will be living here in Kansas City while he will be living in Portland getting things ready for us. I was hoping to get out there in two months, but I am thinking it will be when our lease is up June 3rd.

I just want to thank God for the many blessings he has brought into this amazing life he has in store for me. 

I want to thank all of you for your prayers, positive thoughts and encouraging words. It means the world to me!

Thanks for sharing this adventure with me!

See you soon!

Much love,

Genea

Friday, February 18, 2011

It's ALL your fault- Totally INSPIRED!

Hello friends!

I just wanted to share with you that it's totally, ALL Heather's fault. For what? Well for INSPIRING me!  So I don't know if you saw it, but on February 9th for Bead Table Wednesday this is what Heather posted on her blog.
Here is one of the photos, but you totally need to go to her blog to see the rest! She put together these bead piles from Dream Girl Beads along with some of her beautiful Willow Pendants.  I forgot just how much I loved brown and turquoise together. I had a few more beads to make for the Bead Cruise packages so I decided to use the colors in this palette.

I thought that it would be a  bummer to get all of these amazing boxes of art beads and have to put them all into bags(that and it's an awful lot of work to plan such big events), so I decided Heather needed some fun beads for her creations as well. I figured since these were some of the colors she picked out that it was probably a pretty safe bet that she liked them ;)

So while making these beads I decided to make these discs in the same color palette. I was excited to add Creation is Messy's NEW color "Atlantis" to the set. This color is so NEW it's not yet listed on the page, but you can be sure it will be added to the Blue's section soon! It will also be available at Frantz Art Glass, so keep an eye out ;)
After creating these beads I had an amazing idea for a finished design. Dang, I was totally trying to make these for my shop! 
 Here is the finished necklace. I am SO excited because I knew I wanted the discs to hang in tiers like this, but I wasn't sure how I was going to get it to work out. Well as you can see, I did it! :D I love it when that happens!

Here is another angle shot. Pretty f*ing sweet, if you ask me! I LOVE it :D I called this piece "Running in Circles". 

Wishing you much inspiration and a weekend of awesome!

Much love,

Genea


Wednesday, February 16, 2011

The EGGsperement- Color studies and styles for bird eggs

Hello friends!

I thought you might like to see my experiments while being inspired by spring and all of the eggs, birds, and things I have been seeing lately.

Here are a few of my favorite things others are creating....

Here are Heather's(Humblebeads) eggs. I finally got a chance to really check out all of the amazing things in her shop. I was especially enamored with these style eggs after learning some more about the process. I love all of the layers and earthy feel of her speckly eggs.

I also really love these eggs by Floridity. I saw them through either abs, btw, or Lorelei's site, I forget which one... Anyways, I just LOVE the look of these eggs. I love the way they were created. People are really creating some amazing things in polymer clay since I used it back when I was 14 ;)

So my wonder was, how can I take the egg design and translate it into glass with what I already have at home? Back when I first started making beads I got a collection of reduction frit, which thankfully I didn't spend too much time with, working on a hot head. Hot head torches are pretty much a more reduction flame naturally, but much easier to control and achieve the look you want with an oxygen propane torch.

Anyways... I decided to pull out some silver leaf,  reduction frit,  non-reactive frit from That Frit Girl that I had in my stash to see if I could make some cool eggs.

So first to check out some pictures of eggs on Google. Then I decided to look up birds in my area. I didn't make all of the ones I wrote down, but did some experiments on some common bird eggs.


So first to do some frit testing round beads to see what the colors look like on different bases.
Ok so listed above is the color glass I used. To keep things tidy on the photo I just listed the letters to give a more detailed description in text.

A. Fremen base with That Frit Girl New Light Yellow R-186-1 
Looks a bit too pale for egg speckles.
B. Fremen base with That Frit Girl Sahara R-162-1 This color is a really beautiful pale sandy yellow brown with hints of pink. Not quite the right color for bird eggs.
C. Fremen with Tobacco reduction frit(this was from an old sample pack I had, but check out That Frit Girls version). Spreads too much and a bit metallic for eggs.
D. Fremen with Iris Gold reduction frit reduced(again check out That Frit Girl's version Iris Yellow 218). Much better frit size for speckles, but still too metallic.
E. Dark Ivory base with That Frit Girl New Light Yellow R-186-1
Dark outline reaction with ivory glass. Still not quite the right color.
F. Dark Ivory base with Tobacco reduction frit.
Spreads a lot, and not quite dark enough.
G. Pale Avocado odd- checked out glass to see color. It's streaky on the side(which is not pictured). I think this color might be out of stock due to it being an odd.

Now remember when making these test beads you have to view them quickly and get them into the kiln, so you don't actually get to figure out the best results until your beads are done annealing.

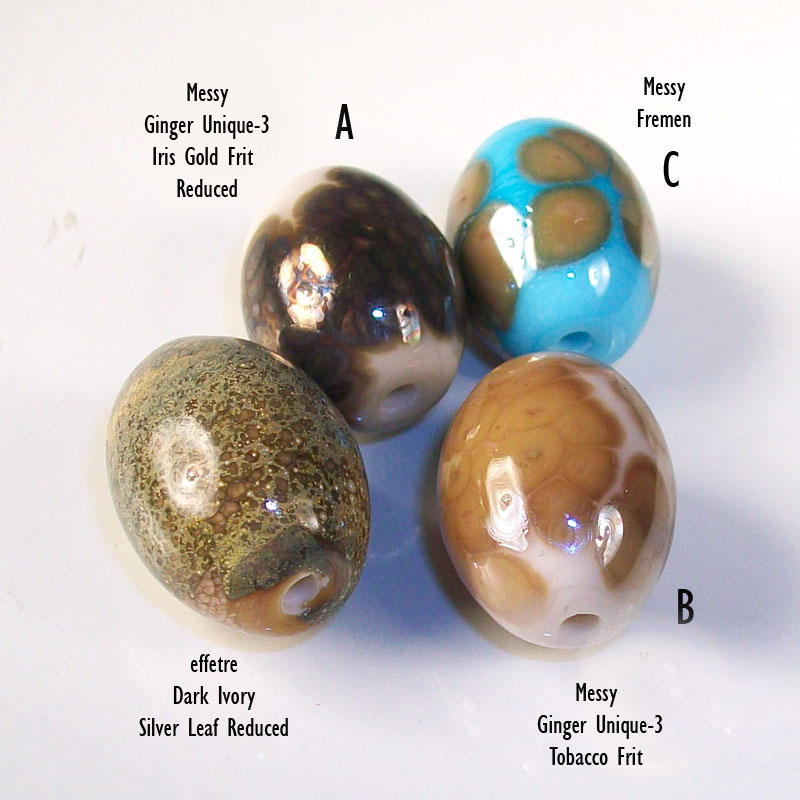
Now for some egg trials. Remember you won't always have exactly the things for your inspiration in your studio when you need them, but sometimes you discover amazing new things when you work with what you've got ;)
A. Unique Ginger-3 with Iris Gold frit reduced.
Nice dark brown color, but too metallic. If you etch the bead note that it will be a lighter color.
B. Unique Ginger-3 with Tobacco reduction frit. 
Still spreads too much for that speckly look and not the right color.
C. Fremen with Tobacco reduction frit reduced.
Frit color is still too light, metallic and spreads.
Dark Ivory rolled in silver leaf and reduced, couldn't remember if it got that really pretty golden color from this style or not. I missed getting a part of the egg covered with silver leaf(see bottom by bead hole) and it looks like the silver fumed the ivory instead getting that color for which I was looking ;)

Ok well so as you noticed, I didn't quite achieve the effects I had hoped, so I decided to just play around with some solid colors. You know their are just plain colored eggs out there. Sometimes after doing many tests and not getting the results you want, it's nice to make something you pretty much know will be successful. 

I admit it's hard for me just to play and not have things turn out. I want EVERY time at the torch to produce the most amazing beads, not that there is anything wrong with the above beads, but you understand ;) It must be that perfectionist in me. I am still recovering....


So here are some plain glass eggs for color testing. I took these same beads and etched them in the picture below for more of a matte look. From left to right: effetre light turquoise, Messy Smurfy, effetre dark turquoise, nest made in Messy Canyon de Chelly(OMG my new favorite next to Stone Ground) This color has some really gorgeous color variations! eggs in effetre dark ivory, dark ivory egg.
Here you can see all of the glass etched(10 minutes in etch all) giving it more of an earthy feel by taking the shiny finish off of the glass. This look also makes them look more like clay. You wouldn't believe how many people ask if etched lampwork beads are really clay and how shocked they are when they discover it's glass ;)

So what did I learn? Well I just have to keep experimenting. I am thinking maybe a nice fine non-reactive frit or maybe some enamels. ;) Oh, before I forget, Messy has some AMAZING soft pastel colors perfect for egg making. Here are some I would recommend: Dirty Martini, Butter Pecan Unique-4, and Butter Pecan Unique -5.

Be sure to check back at the Creation is Messy site later, I did a really awesome color study of all of the Butter Pecan, Ginger, their uniques, and Ivory's. Kathy is up to her ass in alligators at the moment, so I'm sure when she gets her monstrous to-do list done, you will see the photo ;) Be sure to drop her an e-mail and tell her how amazing she is! She is out there making the glass world amazing for us lampworkers :D

Well that about wraps up my color and egg testing. I hope you learned some cool things about glass and color experimenting.

See you soon!

Much love,

Genea