Third Eye Gypsy(Genea Beads) 2011 by Parigo Studios 2010

Showing posts with label recycled sari silk. Show all posts

Tuesday, March 18, 2014

Wooly Wire "One-oh-FUN" by Genea Beads- Class at Bead Fest Philly August 22, 2014!

Hello friends!

I am super EXCITED to announce I will be teaching my first BIG class at Bead Fest Philly in August! Not only will we be vending again this year, but I will be teaching you the secrets of working with Wooly Wire! Class is held on August 22nd from 4:30-8:30pm. Cost for class is $110 along with a special show price kit fee of $55(valued at over $110!) .
You can click on the link Wooly Wire "One-oh-FUN"! to get signed up for class! You will need to scroll almost ALL the way down the page to get to the link, but I promise it's there! ;)

So what will you learn in class? Well when asked most of you were pretty intimidated to pick up Wooly Wire. I want to ease your mind about working with this FABULOUS new wire! You work with Wooly Wire just like you would any other wire except it's fuzzy and colorful. You just do a little felting and tucking of the end of the wire to secure it, but it can do just about anything else you normally do with regular metal wire. Here is a link to my "Finishing the ends of Wooly Wire and wire-wrapped bead" video tutorial.

I will be teaching you to: wrap, coil, spiral, and finish the ends of Wooly Wire! You will learn to: make a Wooly Wire bail, a corkscrew spiral necklace, and weave a pair of earrings! I will even be showing you how to make one of my recycled sari silk necklaces! I am very confident when you leave class you will not only feel super comfortable working with Wooly Wire, but you will be ready to DIVE into pushing the limits of your design!
For the class I thought you all would love working with my stone textured beads and who doesn't love that pinky purple?!
I chose a simple yet funky design for the necklace. I wanted you all to learn some basic and fun techniques with an "everyday" style necklace to wear.

My "Ancient Tapestry" earrings were VERY well received so I decided to also include the creation of these fabulous earrings to the class! The black and rainbow goes with just about every outfit! 

Delightful, no?! 

Well don't delay! Hop on over and get signed up now as we may fill up well before the show!

I can't wait to see you there!

xo Genea


Monday, March 17, 2014

Jael has received her soup!

Hello friends!

Well Jael has received her soup so I will post photos of what I sent! 
I like doing themes when I send soup so I did a Sea Urchin theme. The sea urchin themed beads are one of my most fantastical glass beads and are also on the cover of the current issue of Bead Design Studio March/April 2014! I figured this was the way to go with my soup this time around!

So here are the beads: Silvered fossil spacers- a new glass color I picked up wrapped in a gorgeous silvered ivory band. This is a new design and I loved it so well I used the same base for the NEW "Rainbow Urchin Silver Sand" Wing Dings! I create them specifically for this soup cause Wing Dings on their own are awesome, but add an urchin and they are just out of this world! It wouldn't be complete without one of my "Ocean Urchin Egg" focals and a "Rainbow Urchin" clasp! Jael's clasp is a button style clasp. I had this base prepped so I thought I would try out a button style as well. It turned out awesome so I may make more in the future. You can't have an entire set of  urchin beads without a glass headpin so I created the "Ocean Urchin" "Innies" and "Outies" style headpins. I just love this collection of beads! I can't wait to see what Jael does with it!

I also sent along some of my favorites! I sent a few colors of recycled sari silk, some cable chain from rings & things, and of course, Raku Wooly Wire that was made especially to match my raku beads :D!

You can check out her post about her soup she received from me here. I didn't click a ton of photos of the entire soup as I wanted to rush it out in the mail, but Jael took some wonderful photos of opening her soup! 

I can't wait to receive my soup from her and will post when it arrives in the mail :D

See ya soon!

xo Genea

Saturday, February 15, 2014

Recycled Sari Silk 18-10" Adjustable necklace- Video Tutorial!

Hello friends!

So I finally just decided to do this video tutorial. A long while back I did a step by step photo tutorial on this. Yes, it's easy and simple, but it is also: super pretty, recycled, and handy to have on hand. I had originally thought to offer it as a very inexpensive tutorial, but later just decided to botch that idea and do a free video instead. This simple necklace is perfect for: creating a quick gift, having a ready made piece to offer at shows, or for a great everyday simple piece. So before I show off the tutorial how about a little background on how it came to be and where the infatuation started.

THE STORY.....
So many years back in my early lampwork career I used to use things like rat tail. It worked, but the cording was so thin.

Then there were the inexpensive Chinese ribbon cords. Sure they came in a variety of colors, but there were still nothing compared to fairy silk, which was my true love in cording. Necklace from 2009ish? See where the "Bright Earth" Wing Ding palette originated? ;)


Fairy silk was so gorgeous and it's like it was made just to match with every color of glass. Vortex Flower necklaces from 2010.

The down side was that fairy silk was so expensive. It was over $8 a cord and with no wholesale license at the time there was no bulk order I could make. As much as I loved the cord it just wasn't cost effective for me.

Then I fell in LOVE with sari silk. It was not only GORGEOUS, but it was inexpensive, recycled(I love all recycled and re-used things), and available in batches with gorgeous color variations. I couldn't think of anything better!

When I first moved to my apartment I decided that I needed to leave my studio at mom's house. So I took that busy time with no lampworking to find other things to create. That is when I came up with the Recycled Sari Silk adjustable necklaces. I loved making them so much I sat down and mad a gagillion!

THE TUTORIAL
So my gift to you is this super fun, super easy, and super addictive, Recycled Sari Silk 18-20" adjustable necklace.

See how great this looks for this simple necklace?

Want to just show off that incredible focal on a simple cording? Viola! Necklace available here.

So get to work and make some of those recycled sari silk necklace cords!

See you soon!

xo Genea

Friday, October 19, 2012

Genea C-K jewelry shop update! Breast Cancer Awareness jewelry.

Hello friends!

I am excited to FINALLY be updating my Genea C-K jewelry shop! I even spend a good chunk of the day yesterday creating an awesome banner and avatar :D I decided to divide up my Etsy shops to better accommodate my customers. I have SO much stuff to add to the shop it's not even funny! Can you believe the holidays are RIGHT around the corner??!

This post will also help give you some ideas of what to create with my breast cancer awareness beads as well :) I even made another collage with pic monkey

Here is a collage of all of the jewelry I just listed. Isn't it so pretty in it's nice little pink template :D


"Boobies" earrings. I must say I was really excited to make these. They are simple, but so cute. I wore some out the other day and I was surprised no one said a thing! Dang! Well maybe you will be more lucky when you wear yours out on the town! ;)


"Pink Ribbon Boobies" bracelet- This fun little bracelet has some wonderful accents: a boobie dot headpin, a pink ribbon headpin, some super sweet pink weeny dings and a spiral pink ribbon spacer :D 

"Pink Ribbon Boobies" necklace. I really love this piece. It's super simple, but just a perfect design. So comfortable to wear. 
Here you can see how you can adjust the necklace to be longer or shorter with the adjustable chain in the front ;) I wanted to add this element to the front to show off the clasp and the sweet dangle at the bottom really just finishes it off.

"Pink Ribbon" earrings. Just a nice little simple pair of pink ribbon earrings. Not too fussy and not too long. Perfect for every day wear ;)

"Pink Ribbon Pixies" Just a little twist on the pink ribbon design with a few extra pinks and a little bit more dangle. super cute! 
To finish off some amazing jewelry an equally amazing wrapping! Each piece will come in a larger box like this or a smaller size box with pretty pink tissue and a pink tied ribbon :D

Now how's that for service?!

Thanks for checking out my new jewelry!

Happy Friday!

xo Genea

Thursday, April 19, 2012

Bridesmaid Jewelry!

Hello friends!

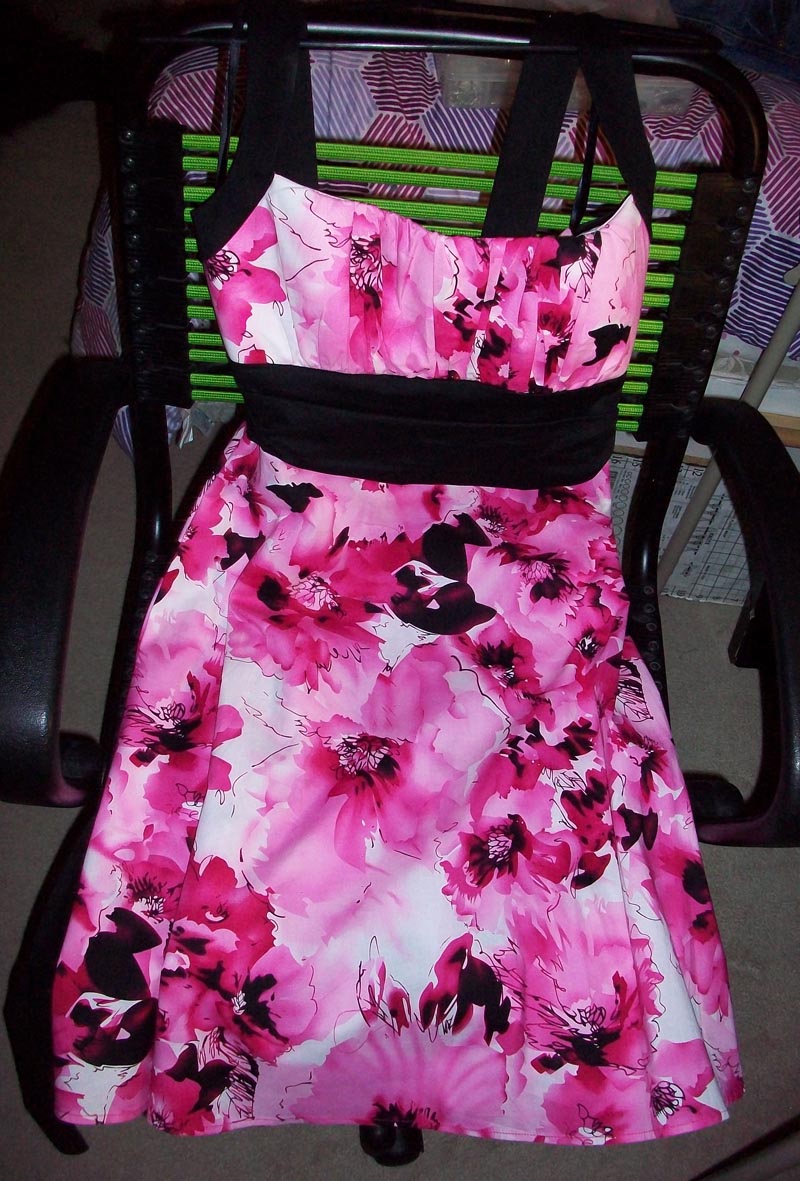
So if you remember my post from the other day I was talking about finishing my jewelry for the wedding. I decided last minute to put together some beads and jewelry for my dress. 
Here is my dress! Perfect huh? Nice and BRIGHT! None of the wedding party will be matching so we just had to get a cute sun dress. This dress is not only pretty, but it flatters my body shape so much! It feels like the dress was tailored to me specifically :D It's such a nice feeling to put something on and feel gorgeous in it!

So the other day during my amazing lampworking session(one of those days where you are just amazed at your artistic skill) I whipped up these flower beads to match my dress. They flowers on the dress are pretty free form so I made this big disc, creased some petal shapes and then pressed across the length of the flower to give it a petaly feel.

I, for once in my life, decided to do something really simple. I grabbed some sari silk, leather and wire and quickly assembled this piece! It looks fantastic with the dress! Just perfect enough to catch your eye, but also blend beautifully!

Here is the jewelry worn :D

I'll post some wedding photos after this weekend! 

Have a great weekend and see you soon!

xo Genea

Wednesday, April 18, 2012

New Packaging!


Hello friends!

I'm excited about my new packaging I have been working on! After receiving such amazing wrappings from my dear friend, Karen Totten I decided to step up my packaging!

So first I had always seen my logo as a stamp in my mind. I could use this stamp for all sorts of things like hand stamping my own cards, bags, boxes , whatever...
Here is my stamp. The one on the left is my silicone stamper. On the right is a traditional rubber stamp. I bought my logo stamp from my rubber stamp 

So my original idea was to use acrylic paint, brayer the paint together to make a gradient and stamp.
The paint was kind of thick....
So I tried, and tried, and tried. I even tried some old stamp pads I had lying around and those didn't quite work right either....
This was about the best one I got. Dang.... still not quite right.

So off to the store I went in search of an ink pad. My rubber stamp suggested using adirondak stamp pads. I went to my local crafty stores to see what they had. While looking I found these amazing inks by Color Box. Mmmmmm just my colors all in one stack!!


Here is a photo of the stack with my stamper, a stamped box and my matching sari silk. the photo is a little dark since I took it with my cell phone, but you get the idea ;)
Now to make the cards! My friends have a Silouette machine(its like that Cricket scrapbooking machine). My friend Brandon created me a circle shaped card . While Brandon is creating the image he ask me "Do you want perforations?". I said "Perforations?! YES!!". So I'm thinking it's just a line, right? NOPE, it's a cut dashed line so that you can fold the card perfectly in the middle! Wow, fancy pants machines they make now a days!
Here aer some of the cards cut out. They look like boobs or bikini tops. Lol. When the machine cuts out the images it sounds like an evil circus. If you have ever heard those engraving machines, that is exactly what the sound is. All these funny pitches and noises. I think its some sort of weird robot language. It may have been trying to rally my printer and keyboard against me! Why knows... 
After the cards are folded they get inked. They  are ALL INDIVIDUALLY INKED ONE at a time by my hands. I take the colors and hand mix them as well to get that pretty gradient. So in short, THESE CARDS ARE A LOT OF WORK! So when you receive one, just at least keep it for a little while? ;)
Like little soldiers.


Here's a close up. Again the photo is a little dark from my phone, but you get the idea. I had some ask me why I didn't print on white. Well here is why... I wanted my items to have that hippy recycled feel. Kraft colored paper seemed like the perfect way to give my work that look and feel :)

Now onto the silk. I have loved recycled sari silk since the first time I have even realized it was around. I am a super green girl, so I LOVE all things recycled. So this recycled sari silk was PERFECT for my new recycled hippy packaging!
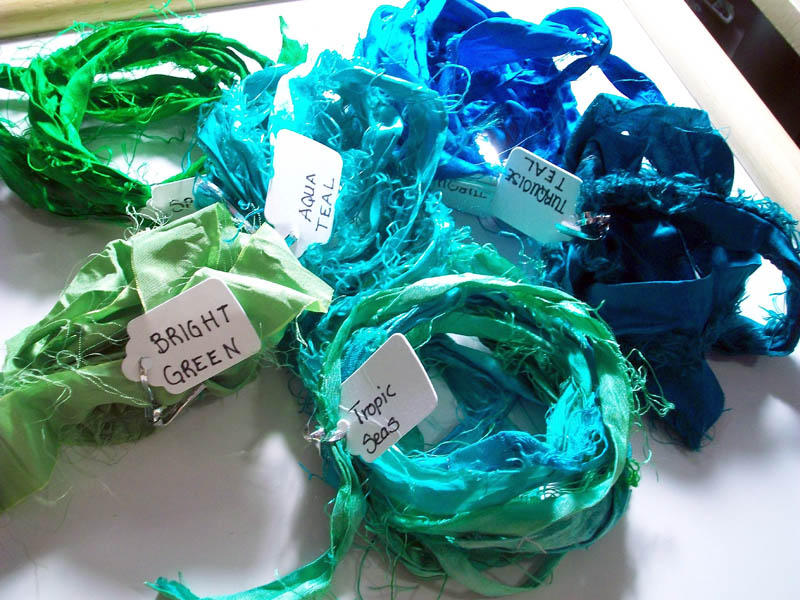
I purchased my lovely silk from Nancy Camp-Zolun. When I ordered I told her what my ideas were for my packaging so she kindly sent me a variety of her silks for me to see in person and decide on my color :D Wow, huh?! They were all so beautiful, but the multi-colored greeny/teal/aqua "Tropic Seas" was my absolute favorite!

Here is my bundle of silk that arrived today! It's even prettier all unraveled! 


So here is what some of the finished packaging looks like. I love the idea of having a silk tie around my packaging. It's a little extra bonus to be used for designing as well as looking awesome! Again, if you don't end up using the silk, please recycle it, give it to  a friend, tie up a gift, whatever, just re-use it! :) In the future I plan to order some kraft colored boxes like in the photo above. 

I also received some wonderful goodies recently that I would love to show-and-tell.


I received these lovely beads from Karen Totten! I can't tel you my plans for them yet since I don't know who reads my blog(they are gifts) ;) Anyways, I am super excited about these and can't wait to get them worked up into something! 

Well it's still crazy hectic around here so hopefully things will settle down after our friends wedding this weekend.

See you soon!

xo Genea